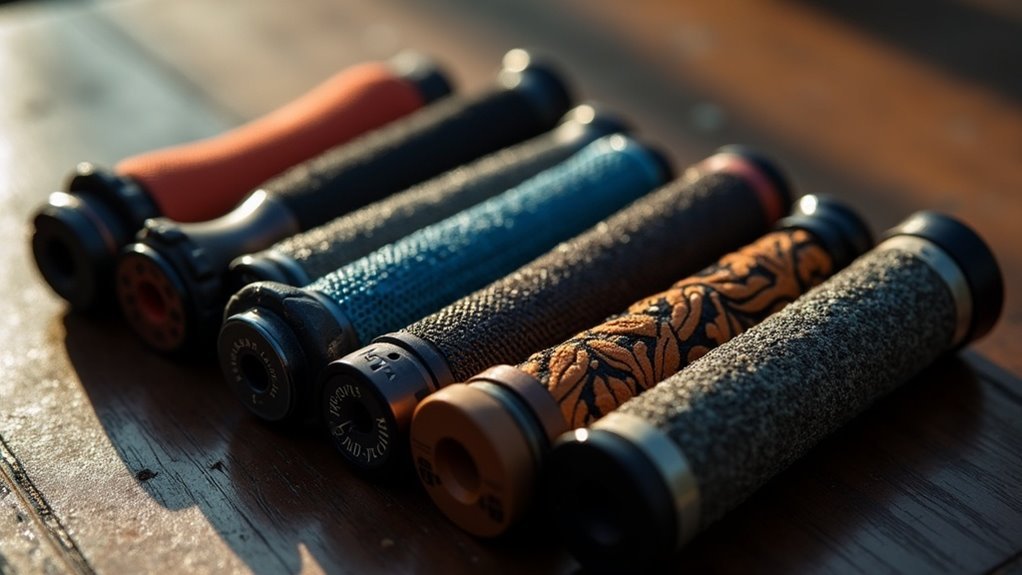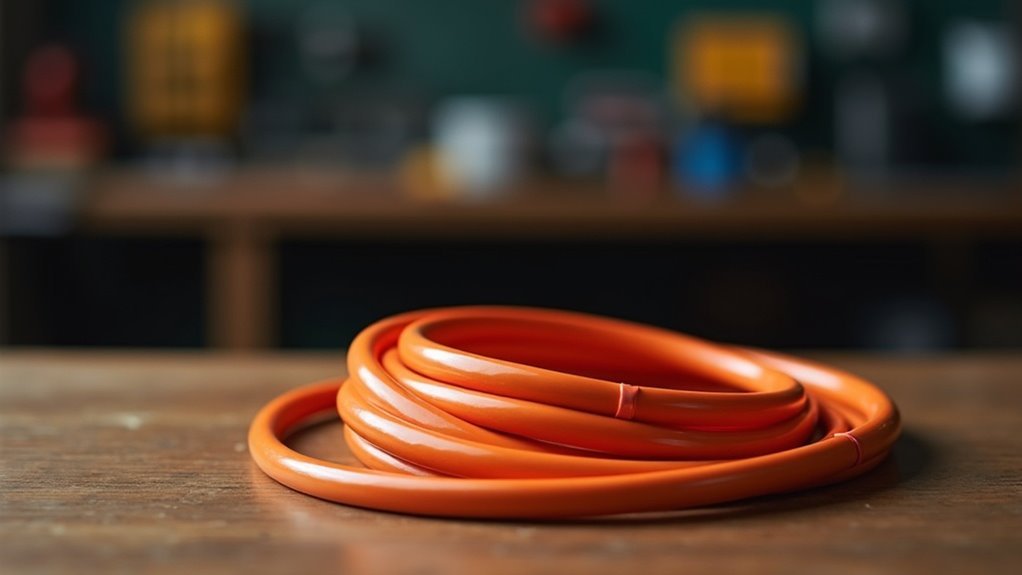
To coil cables neatly for safety in your home gym, use the over-under method. Begin with the connector facing outward, creating an over loop followed by an under loop to maintain balance. Aim for uniform coil lengths between 12 to 18 inches, ensuring each coil is tight and consistent. Secure the coils with ties or velcro to prevent tangling and keep your workout area organized. Regularly check the ties to maintain a tidy and efficient space for your exercises. Explore additional tips and techniques for optimal cable management to enhance your home gym experience.
Key Takeaways
- Utilize the Over-Under method for coiling cables to avoid tangling and kinks, which will enhance the durability and efficiency of your home gym equipment during workouts.
- Keep coil lengths consistent at 12 to 18 inches for a neat appearance, making it easier to access and organize your exercise space.
- Use ties or velcro strips to secure coiled cables, preventing them from unraveling and reducing clutter in your home gym.
- Frequently check the tightness of the ties to maintain organization and prevent wear that could impact the performance of your equipment.
- Designate a specific storage area for your cables to shield them from environmental hazards, ensuring a safe and efficient workout environment for both men and women.
Importance of Proper Coiling Technique
When you use the proper coiling technique for your home gym equipment cables, you not only extend their lifespan but also prevent frustrating tangles and potential damage.
Incorrect methods, like wrapping cables around your arm, can create kinks that compromise performance and durability of your equipment.
Utilizing a recommended coiling technique keeps the cable’s shape intact, avoiding knots that complicate future use during your workouts.
Consistent coil lengths enhance visual organization, making it easier to find what you need quickly, and reduce tangling during storage.
Secure ties, such as tie lines or velcro strips, are essential to maintain the coiled state, ensuring your equipment is always ready for your next training session and improving your overall workout efficiency.
Understanding the Over-Under Method
Using the over-under method for coiling cables is a practical solution that can enhance your home gym setup.
Start by positioning the connector facing out, and create your first coil as an over loop around your hand. Next, form an under coil while keeping your palm up. This balanced technique helps prevent tangles and kinks, ensuring your workout equipment stays organized and ready for use.
Aim for uniform coil lengths to maintain a tidy appearance, which is especially important in a home gym setting. If you notice any unusual bends in the cable, gently roll it in your fingers to correct them.
Maintaining uniform coil lengths is key for an organized home gym, ensuring your cables remain tangle-free and tidy.
Finally, secure your coiled cables with a tie line or Velcro strip to promote safety and efficiency, making it easier to focus on your fitness goals without any distractions.
Steps to Execute the Over-Under Technique
To start coiling your exercise cables, hold the connector facing out and loop the first coil over your hand.
Next, create the second coil by turning your palm up and forming an under-loop that aligns with your left hand’s thumbs.
Continue alternating between over and under loops to ensure a neat and uniform coil throughout the process.
This technique helps keep your home gym organized, making it easier to maintain an effective workout routine.
Initial Coil Formation
Coiling cables neatly starts with mastering the over-under technique, which is essential for maintaining an organized home gym environment.
Follow these instructions for initial coil formation to keep your equipment tidy:
- Hold the cable securely with the connector facing out, ensuring easy access for your home gym setup.
- Create the first coil by looping the cable around your hand in an over-loop, promoting a neat appearance.
- For the second coil, grab the cable with your right hand, palm up, and turn to form an under-loop, balancing the coil formation.
- Alternate between over-loops and under-loops, checking for bends and rolling the cable in your fingers to maintain its natural shape, which helps prolong the life of your equipment.
This method guarantees uniform coils and prevents tangling, enhancing cable management and ensuring your home workout space remains clutter-free.
Finalizing Coiled Cables
Once you’ve mastered the over-under technique for initial coil formation, the next step is finalizing your coiled cables for ideal storage and transport in your home gym.
Use a tie line or velcro strip to securely fasten the coiled cable, ensuring it doesn’t unravel during workouts. Aim for uniform coil lengths to enhance visual uniformity, which aids in cable management and reduces tangling, making it easier to access your equipment.
Position the tie or strip near the middle of the coil to maintain its shape and facilitate quick access when you’re ready to exercise.
Regularly check for bends or twists and adjust as necessary to preserve the cable’s integrity, creating a safer workout environment and prolonging cable life, ultimately supporting your fitness journey at home.
Handling Cable Bends During Coiling
As you handle cables for your home gym equipment during coiling, it’s crucial to be mindful of any unusual bends that may occur. These bends can lead to damage and reduce the cable’s lifespan. If you spot a bend, stop immediately and evaluate the cable to avoid permanent kinks.
Be cautious of bends while coiling cables; they can damage your equipment and shorten cable lifespan.
Follow these steps to ensure proper handling:
- Gently roll the cable in your fingers, allowing it to follow its natural path to maintain functionality.
- Before coiling, check for correct bend placements to ensure the cable remains in good condition.
- Keep the cable straight and free of twists to prevent any disruptions during your workouts.
- Handle the cable with care to avoid a wonky appearance and ensure uniform coils, which will help keep your home gym organized.
Ensuring Uniform Coil Lengths
To ensure uniform coil lengths for your home gym cables, strive for each coil to be the same size during the coiling process.
This consistency not only enhances the organization of your workout space but also reduces the risk of tangling when you store or set up your equipment.
Consistent Lengths for Coils
Achieving consistent lengths for resistance bands and cables not only enhances your home gym’s visual organization but also minimizes the risk of tangling during storage or transport.
To ensure uniform coil lengths for your equipment, follow these steps:
- Aim for a coil length of 12 to 18 inches for a tidy appearance.
- Use a measuring tool or reference point for precise gauging.
- Match each coil with the previous one to maintain uniformity.
- Easily identify specific bands or cables, boosting your workout efficiency.
Maintaining consistent coil lengths helps preserve the longevity of your gym equipment, as evenly coiled cables and bands face less stress and strain compared to irregularly sized coils.
This ensures they remain in excellent condition for your home workouts.
Visual Aids for Organization
Uniform coil lengths for your home gym equipment cables greatly improve your workout space’s organization, making it easier to locate and manage cords efficiently. Aim for each coil to be approximately the same size, as this consistency aids in identifying and retrieving specific cables quickly when you’re ready to exercise.
Use the over-under coiling technique to achieve uniform lengths, promoting even spacing while reducing kinks and bends that could hinder your workout. As you coil, visually inspect each one; promptly adjust any that deviate from the others to maintain a tidy appearance in your gym area.
Additionally, consider color-coded ties or labels for different types of equipment, enhancing organization and facilitating quick identification when you’re in the zone for a home workout.
Reducing Tangling Issues
While it might seem minor, ensuring consistent coil lengths is essential for reducing tangling issues with your home gym cables. Here’s how to achieve uniformity:
- Aim for coils about 6-12 inches in diameter for ideal storage of your workout cables.
- Use the over-under coiling technique to promote even tension and reduce wear on your equipment.
- Store cables vertically or stacked to prevent them from intertwining, keeping your home gym organized.
- Regularly practice this technique to enhance familiarity and maintain consistency for an efficient workout space.
Finalizing the Cable Coiling Process
To finalize the cable coiling process effectively for your home gym equipment, secure your coiled cables using a tie line or velcro strip. This prevents them from unraveling during transport or storage, ensuring your workout space remains organized and clutter-free.
Make sure the secured coils are neatly arranged to facilitate easy access, enhancing your workout efficiency. Properly secured cables minimize tangling and help maintain their integrity and longevity, which is crucial for your exercise routines.
Regularly check the tightness of your ties, as loose ties can lead to disorganization and increased wear, affecting your gym equipment’s performance.
Finally, store your coiled cables in a designated area that protects them from environmental hazards, ensuring they’re ready for use whenever you need to hit your fitness goals at home.
Benefits of Effective Cable Management
Effective cable management is crucial for creating a safe and efficient home gym environment. It not only keeps your workout area tidy but also promotes safety, productivity, and the durability of your equipment.
Here are some significant benefits tailored for those who exercise at home:
- Reduces tripping hazards by keeping cables organized and out of walkways, allowing you to focus on your workout without distractions.
- Prevents tangling with properly coiled cables, making it easier to access and switch between different equipment during your sessions.
- Extends cable lifespan by using the over-under coiling technique, which minimizes wear and tear—helping you save on replacements.
- Enhances workflow efficiency because neatly organized cables are simpler to transport and store, allowing you to maximize your workout time.